
related illnesses such as heat exhaustion and stroke. Clothing choice can impact how you feel and handle sweating when it is hot. Wear loose-fitting clothing made of lightweight materials. Choose light-colored clothing to reflect the sun's rays instead of dark colors, which absorb them. A lightweight hat can also help you regulate your temperature by keeping your head cool. If you are doing more strenuous activities in the heat, consider applying pro athletes' methods by wetting your clothing or using small amounts of ice to keep you cool. You can purchase cooling products, such as bandanas, hats, and arm sleeves, designed with small pockets to stuff with ice. You can also buy cooling products that are worn wet, using cold water instead of ice for similar results. Cooling your head, neck, and core can significantly improve your tolerance to heat. Next, it is important to hydrate. Start hydrating before going outside and continue throughout your activity. Bring a soft flask, hydration pack, or reusable water bottle to carry the appropriate amount of water for your activity. Sweating is one of the natural ways our body thermoregulates to maintain its temperature. We need adequate amounts of hydration to be able to produce sweat. If you sweat a lot, a sports drink can aid in electrolyte replacement; however, ones with high sugar content can lead to further dehydration. Continue to hydrate once you come back inside.
Here are a few ideas for summer activities that may offer lower temperatures or cooling opportunities:
**Always consult a doctor about nutrition, hydration, and activity for solutions specific to your body’s individualized needs. Be sure to research any chosen activities, such as hiking or biking routes, to prepare adequately, understand natural hazards, and ensure they are appropriate for you. ** AuthorKaryn Dulaney, PT, DPT, is a physical therapist who has practiced in outpatient orthopedics for almost 2 decades. She enjoys helping patients achieve their personal goals and maintain a healthy, active lifestyle. An avid outdoor enthusiast and competitor/participant in various adventure sports, she is passionate about helping others explore outdoor activities for the mental and physical health benefits that come with them. Karyn co-founded the Community Gear Closet, which lends outdoor gear so others can have opportunities for their own outdoor adventures.
Another benefit of cycling is that it is a great form of low-impact exercise. It can help build aerobic fitness and leg strength. The balance and skill required to bike improve coordination, proprioception, and spatial awareness. Cycling increases time spent outside, which is a good source of vitamin D. Being outside also has many known mental health benefits, including decreasing stress levels and improving mood. We are lucky to have bike paths throughout Columbia to explore and ride. Other relatively close, family-friendly trails include the C&O Canal Towpath, the Kent Island Cross Island Bike Trail, the BWI Loop, and the Torrey C Brown Trail. Cycling can also be enjoyed as a social activity. Plan to meet friends for a ride or ride your bikes to an event. If you ride your bike to the Columbia lakefront for fireworks on the 4th of July, BikeHoco offers a free bike corral (bike parking) and a chance to win an E-Bike. If your child is more daring and enjoys off-road adventures, the Maryland Interscholastic Cycling League (MICA) offers a variety of groups that include social rides, events, and races. Local bike shops offer group road and trail rides for adults. Another great resource for getting involved in the cycling community is Free Bikes for Kidz Maryland, where you can donate bikes, volunteer to repair or distribute bikes to kids, or connect with a community organization that partners with them to obtain a bike. The best way to get your child excited about biking is to show an example of your enthusiasm for riding. Young children (ages 1 -4) can begin riding with you on a mounted bike seat or in a bike trailer if they can sit well unsupported. It is recommended to check with your pediatrician before riding with your child, as there is always variability in children’s development. It is also important to check with the bike manufacturer to ensure your bike can carry added weight (most can) and the age ranges recommended for the seat or trailer you plan to use. As your child ages, the next best step is to try a balance bike to learn how to balance and steer a bike before transitioning to a standard bicycle that requires pedaling. Another benefit of biking is that it is an environmentally friendly activity. You can decrease air and noise pollution and fossil fuel consumption by running a few errands weekly on a bike instead of in your car. This can also help you meet the CDC guidelines for adults to get 150 minutes of moderate-intensity aerobic exercise weekly. Always bring a bike lock with you and lock your bike before leaving it, even if for a few minutes. Try biking to Freetown Farm one day and check out the bike stop at the top of Harriett Tubman Lane! The Community Gear Closet plans to hold another clinic on the basics of bike maintenance, so stay tuned to learn more. Important Things to Know about Biking:
Some exercises that can help prepare you for cycling: Increase the strength of your legs with:
Keep your knees and flexible after riding with:
AuthorKaryn Dulaney, PT, DPT, is a physical therapist who has practiced in outpatient orthopedics for almost 2 decades. She enjoys helping patients achieve their personal goals and maintain a healthy, active lifestyle. An avid outdoor enthusiast and competitor/participant in various adventure sports, she is passionate about helping others explore outdoor activities for the mental and physical health benefits that come with them. Karyn co-founded the Community Gear Closet, which lends outdoor gear so others can have opportunities for their own outdoor adventures.  The water can offer a cool escape as summer comes into full swing and the temperatures soar. Paddling is a great way to explore the waterways, and Maryland has many rivers and lakes to choose from. The Community Gear Closet has a few inflatable paddle boards, a canoe, and life vests to loan out if you want to try paddling this summer. Here are some essential things to consider for safety and a good experience before heading out. Do your research beforehand: Gather information on where you plan to paddle. Every body of water has different regulations about paddling. These may include the types of paddle craft allowed, the boat length required, use fees, and permit requirements. Most of the Howard County lakes and reservoirs require permits and restrict the use of paddleboards and inflatable water crafts. It is also important to research the body of water or river you are paddling on to educate yourself on potential hazards, such as strainers or unexpected rapids along your route. Know your paddling capabilities and plan accordingly. Research the current water levels as very low or high water levels can lead to different types of hazards. Safety considerations: Always wear an appropriately fitting PFD that is the proper class for your activity. A whistle can also be helpful in an emergency. Inform someone who will be on the land of your intended plan and route ahead of time. Have plenty of drinking water and food. Be sure to wear sunscreen, sunglasses, and/or a wide-brimmed hat to protect yourself from the sun and the glare on the water. Check the weather conditions and forecast ahead of time. Environmental considerations: It is also important to check the water quality where you plan to paddle. Run-off from the rain and bacteria or algae blooms in the summer can be hazardous to your health. If you plan on bringing a furry friend along, this is especially important, as blue-green algae blooms can be toxic to dogs. After paddling, be sure to rinse your vessel to prevent the transfer of aquatic species from one body of water to another. Some exercises to prepare your body for paddling:
AuthorKaryn Dulaney, PT, DPT, is a physical therapist who has practiced in outpatient orthopedics for almost 2 decades. She enjoys helping patients achieve their personal goals and maintain a healthy, active lifestyle. An avid outdoor enthusiast and competitor/participant in various adventure sports, she is passionate about helping others explore outdoor activities for the mental and physical health benefits that come with them. Karyn co-founded the Community Gear Closet, which lends outdoor gear so others can have opportunities for their own outdoor adventures.  With longer days and warmer weather, it is a great time of year to hit the trails. We are lucky to have great hiking trails in many parks in Howard County, such as Patapsco State Park, Middle Patuxent Environmental Area, and Wincopin Trails. A little knowledge and preparation can make your next or your first hike a more enjoyable experience! The Community Gear Closet has numerous backpacks, tents, and sleeping pads available if you wish to extend your day hiking trips into a backpacking adventure. Trekking poles and some smaller day packs are also available to borrow.
AuthorKaryn Dulaney, PT, DPT, is a physical therapist who has practiced in outpatient orthopedics for almost 2 decades. She enjoys helping patients achieve their personal goals and maintain a healthy, active lifestyle. An avid outdoor enthusiast and competitor/participant in various adventure sports, she is passionate about helping others explore outdoor activities for the mental and physical health benefits that come with them. Karyn co-founded the Community Gear Closet, which lends outdoor gear so others can have opportunities for their own outdoor adventures. Spring is here, and we are back in our gardens! In last month's PT Corner, I gave some tips on how to create strong shoulders. Moving down the arm, here are tips for preventing injuries in your elbows, wrists, and hands by warming up, using proper mechanics as you garden, and performing stretches afterward. Before A dynamic warm-up before being active increases blood flow, priming our muscles to work. It also helps to increase the available range of motion in the muscles and joints to prepare them for the activity you plan to do. Gardening and yard work requires reaching in a variety of directions. It requires the elbows and wrists to bend and flex and our fingers to open and close. Here are examples of beneficial warm-up exercises to do before you start gardening.
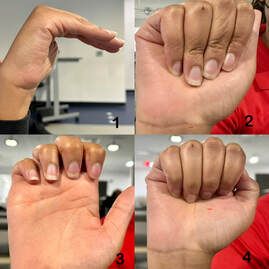 During Paying attention to the mechanics of your arms while performing yard work can help prevent overuse injuries such as carpal tunnel syndrome and tennis or golfer's elbow. Always keep your wrist neutral when using your hands and tools to dig, yank, or pull. Minimize side-to-side or twisting motions at the wrist. Engage your shoulders by pulling your shoulder blades back and together before pushing, pulling, lifting, or carrying objects. Properly fitting gloves can prevent objects from slipping and deter excessive squeezing and gripping from the fingers. After Static stretching involves holding a stretch for a sustained period. This type of stretching is best for after activity to prevent muscle tightness. Examples of stretches to perform after yard work include:
 3. Chest and Bicep Stretch - With your arms straight, clasp your hands behind your back. Keeping your body upright, slowly raise them toward the ceiling until you feel a stretch in your chest and the front of your arms. Hold for 30 seconds. Repeat 3X  Finally, self-massage techniques can also help reduce post-activity soreness. Regular massage can help the muscles maintain flexibility, enabling your joints to have the appropriate range of motion. Pressure applied should be tolerable for 1-2 minutes of self-massage.
AuthorKaryn Dulaney, PT, DPT, is a physical therapist who has practiced in outpatient orthopedics for almost 2 decades. She enjoys helping patients achieve their personal goals and maintain a healthy, active lifestyle. An avid outdoor enthusiast and competitor/participant in various adventure sports, she is passionate about helping others explore outdoor activities for the mental and physical health benefits that come with them. Karyn co-founded the Community Gear Closet, which lends outdoor gear so others can have opportunities for their own outdoor adventures. Spring gardening is almost here! As we think of the various things we must do to prep our gardens, remember to prepare your body to lift, carry, reach, push, and pull. Having good strength and stability in the shoulders is essential to performing these activities properly. Weakness in the shoulders can lead to poor mechanics and compensations throughout the forearms and hands. Due to the repetitive nature of gardening tasks, this, in turn, can lead to overuse injuries such as shoulder impingement, golfer’s elbow, and tennis elbow. These are some of my favorite exercises to improve general shoulder stability. To ease into any exercise routine, start with lower resistance and higher repetitions, such as 2 sets of 10 repetitions. Once this becomes easy, gradually progress resistance. Serratus flexion Stand with a resistance band looped around your wrists, palms facing inward, and your elbows bent to 90 degrees. Gently push your hands into the band until they are about shoulder-width apart. Next, lift your hands overhead, keeping tension on the band. Finally, lower your arms back down. Repeat 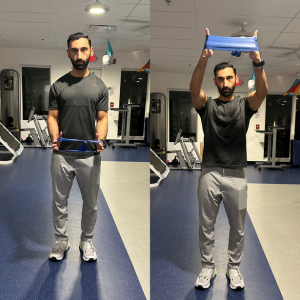 Standing Row Anchor a resistance band in front of you at chest height. Hold both ends of the resistance band. Pull your arms back against the resistance, bending at the elbows and squeezing your shoulder blades together. Slowly return to the start position. Repeat. 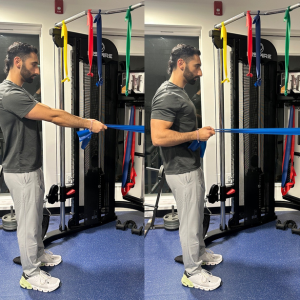 Standing T's Holding a band, lift your arms straight before your body to shoulder height. Create tension on the band by pulling your hands apart and squeezing your shoulder blades together. Slowly return to the start position. Repeat. 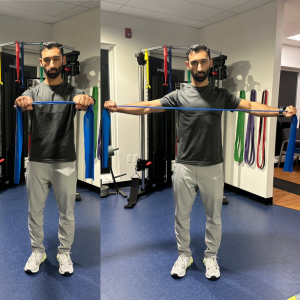 No Monies Stand with your arms at your side, holding a resistance band in both hands. Bend your elbows to 90 degrees with your palms up. Pull the band apart, keeping your elbows bent and tucked into your sides. Squeeze your shoulder blades together. Slowly return to the start position. Repeat. 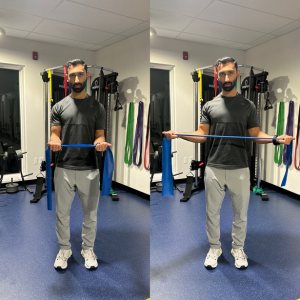 Please remember all bodies and capabilities are unique and individualized. It is always wise to consult a medical professional before starting an exercise program. These exercises are for general information and are not meant to substitute medical advice. AuthorKaryn DuLaney, PT, DPT, is a physical therapist who has practiced in outpatient orthopedics for almost 2 decades. She enjoys helping patients achieve their personal goals and maintain a healthy, active lifestyle. An avid outdoor enthusiast and competitor/participant in various adventure sports, she is passionate about helping others explore outdoor activities for the mental and physical health benefits that come with them. Karyn co-founded the Community Gear Closet, which lends outdoor gear so others can have opportunities for their own outdoor adventures.
When snow blankets the ground, it can create a beautiful winter wonderland. It can also create a hardship for many with caring for snow-covered sidewalks and driveways. Snow shoveling is estimated to cause an average of 115,000 injuries a year. In a study that reviewed snow shovel-related injuries over a 17-year period, it was found that the most common cause for these injuries was due to over-exertion of the musculoskeletal system. Low back pain and strains accounted for 34% of the injuries (Watson et al, 2011). The following are some tips on shoveling mechanics to prevent low back pain. 1. Always start with a warm-up for your body prior to heading outside. A warm-up is important to gradually increase the heart rate which improves blood flow to the muscles. Priming the muscles to work decreases the risk of muscle strains. 2. While shoveling, try to minimize bending from the back. Keep your feet about hip-width apart with a bend at the knees. Position one hand towards the end of the shovel, and grip closer to the blade with your other hand. The shovel should stay close to your body. 3. When possible, push the shovel in a forward motion. Think about initiating the push from your hips. Take small steps while shoveling to prevent slipping. 20% of shoveling-related injuries are caused by falls (1). 4. To empty the shovel, turn your feet in the direction you plan to dump the snow, initiating the pivot from the back leg. This prevents twisting which is often an irritating motion to the lumbar spine. Generate power for this motion by bending your knees and driving with your hips. 5. Take frequent rest breaks and switch your leading hand to prevent over-exertion and over-use of the same muscles. If the snow is deep, shovel small layers at a time. For prolonged snowfalls, shovel intermittently throughout the day to prevent having to remove heavy loads of snow at one time. As with all exercise, stay hydrated during and after activity. 6. The type of shovel you use is also important for proper mechanics. Ergonomic shovels are designed to minimize stress on the body. Your size and strength will dictate the appropriate size to use. If you have a larger shovel, fill it only part of the way before dumping the snow to prevent repetitive heavy lifting. 7. If you need to apply a de-icer, do this when you have finished shoveling. Magnesium Chloride is considered the least toxic type of deicing salt for plants and animals. Deicers should be spread sparingly. While only salt/salt mixtures will melt ice, there are many natural alternatives to improve traction that are less harmful to the environment. Examples of these include bird seed and kitty litter (2). References: 1. Watons, D., Shields, B., & Smith, G. (2011). Snow shovel-related injuries and medical emergencies treated in US EDs, 1990-2006. The American journal of emergency medicine, 29 (1), 11-17. https://pubmed.ncbi.nlm.nih.gov/20825768/ 2. Carroll County Environmental Advisory Council (2022, October 20). Guide to salt management for homeowners: deicing and water softeners. https://www.carrollcountymd.gov/media/17123/guide-to-salt-mgmt-for-homeowners-2022-2022-oct-20.pdf AuthorKaryn DuLaney, PT, DPT, is a physical therapist who has practiced in outpatient orthopedics for almost 2 decades. She enjoys helping patients achieve their personal goals and maintain a healthy, active lifestyle. An avid outdoor enthusiast and competitor/participant in various adventure sports, she is passionate about helping others explore outdoor activities for the mental and physical health benefits that come with them. Karyn co-founded the Community Gear Closet, which lends outdoor gear so others can have opportunities for their own outdoor adventures. Did you set any New Year Goals or resolutions this year? It is estimated that 48% of New Year's goals set for 2024 are based on exercise and fitness (1). Exercise is one of the most important things we can do to maintain our health and quality of life as we age. It helps to improve bone health, cognition, memory, and mental health. Exercise can increase stamina and decrease the risk of falling. Furthermore, it can lower the risk of many diseases, such as high blood pressure and Type II Diabetes (2). Because of exercise's multisystemic benefits on our bodies, consider making your fitness a top priority in the new year. The good news is that gardening and yard work count as exercise! Health standards and guidelines advise adults to participate in at least 150 minutes of moderate aerobic exercise or 75 minutes of vigorous exercise weekly (2). General gardening activities such as raking or pushing a mower are examples of this type of cardiovascular exercise. The speed you are working at, or the type of terrain, may factor into whether the activity is classified as moderate or vigorous. The CDC generally categorizes the following as moderate exercise: raking, pushing a power mower, bagging grass or leaves, light shoveling or digging (less than 10 lbs per minute), weeding, planting trees, or trimming shrubs and trees. Examples of activities that are classified as vigorous include heavy or rapid shoveling (more than 10 lbs per minute), digging ditches, felling trees, pushing a nonmotorized lawn mower, swinging an ax, or hand-splitting logs (3). In addition to aerobic exercise, it is also recommended to perform a strength training program twice a week (2). Strength programs should target all major muscle groups. Examples of activities in your yard that count as strength training include lifting bags of mulch, moving heavy pots, stacking or carrying pieces of wood, and hauling large branches (3). Time spent outside and in nature while working in your yard or community garden plot helps to decrease stress, increase vitamin D levels, and contribute to a non-sedentary lifestyle. To continue to enjoy your gardening activities, consider making a targeted strength program or exercise routine that addresses the numerous muscles required to lift, push, pull, and carry objects. Additionally, consider that your joints need the available range of motion required to do these tasks. It is important to have a good stretching program that will allow you to bend, reach, and stretch to get those difficult parts of your garden. As with initiating any exercise program, always gradually ease into a new routine and consult with your physician first. Best wishes that a healthy you contribute to sustaining a bountiful garden in 2024! To learn more about the suggested guidelines for exercise and examples of each, please visit The American Heart Association Website Sources: 1. Davis, Sarah. (2023, December 18). New Year's Resolution Statistics 2024. Forbes Health. https://www.forbes.com/health/mind/new-years-resolutions-statistics/ 2. American Heart Association. (2023, October 24). Recommendations for Physical Activity in Adults and Kids. American Heart Association. https://www.heart.org/en/healthy-living/fitness/fitness-basics/aha-recs-for-physical-activity-in-adults 3. CDC. (n.d.). General physical activities defined by levels of intensity. https://www.cdc.gov/nccdphp/dnpa/physical/pdf/pa_intensity_table_2_1.pdf AuthorKaryn DuLaney, PT, DPT, is a physical therapist who has practiced in outpatient orthopedics for almost 2 decades. She enjoys helping patients achieve their personal goals and maintain a healthy, active lifestyle. An avid outdoor enthusiast and competitor/participant in various adventure sports, she is passionate about helping others explore outdoor activities for the mental and physical health benefits that come with them. Karyn co-founded the Community Gear Closet, which lends outdoor gear so others can have opportunities for their own outdoor adventures. Thinking about cover cropping this fall? Prior to seed sowing, the area must first be prepped by clearing it of weeds. Proper mechanics for the repetitive motions of weeding can help to improve endurance, prevent overuse injuries, and decrease post-activity muscle soreness. Additionally, changing positions every 15-20 minutes and taking frequent rest breaks are also beneficial for these reasons. Remember to always warm up prior to doing yard work, particularly when it is cold outside. If you have healthy knees, consider weeding in a quadruped position. While on all fours, engage your abdominal muscles by drawing your belly button towards your spine. One hand will remain on the ground stacked under your shoulder while you use the other arm to pull weeds. The multiple points of contact on the ground with your knees, feet, and hand provide good stability while the quadruped position keeps the spine in a straight position. Another technique is the tall kneel position, with one knee up and one knee down. This position also enables you to get close to the weeds without bending or reaching. Keep one leg forward with your foot flat on the ground and the other leg positioned so your knee is directly under your hip. Weed in the space near your front leg, maintaining a straight spine. If using either kneeling position, place a foam pad under your knees to protect your joints. If your knees cannot tolerate loading in the above positions, consider the use of a gardening bench. This enables you to stay low to the ground, close to where you are working. Keep your legs wide enough apart to enable the use of a hip hinging technique to prevent rounding of your lower back as you reach for the weeds. Position the bench in the direction you are pulling the weeds to prevent twisting of the spine. Minimize strain on the forearm musculature and wrists when pulling weeds by keeping your wrist in a neutral position. Rely on the shoulders for the pulling motion instead of bending the wrist upwards. The use of ergonomic tools with wide grips and good padding reduces compressive forces on the wrist and hand tendons. Likewise, properly fitting gardening gloves enable better control when handling tools and materials. This can also help prevent over-gripping which quickly fatigues the smaller hand muscles. AuthorKaryn DuLaney, PT, DPT, is a physical therapist who has practiced in outpatient orthopedics for almost 2 decades. She enjoys helping patients achieve their personal goals and maintain a healthy, active lifestyle. An avid outdoor enthusiast and competitor/participant in various adventure sports, she is passionate about helping others explore outdoor activities for the mental and physical health benefits that come with them. Karyn co-founded the Community Gear Closet, which lends outdoor gear so others can have opportunities for their own outdoor adventures. |
AuthorSThe Community Ecology Institute co-authors the material on this blog with the support of several team members. Categories
All
Archives
July 2024
|


 RSS Feed